Building, Hardening, and Evaluating an elementary OS Workstation in VirtualBox
- fabztechtips
- 6 days ago
- 5 min read
Welcome to my latest home lab project! In this post, I will take you through the complete deployment, configuration, security hardening, and evaluation of an elementary OS workstation.
While my initial plan suggested using Hyper-V, I chose Oracle VirtualBox. As it provides seamless bridged networking and straightforward hardware provisioning, making it ideal for testing a consumer-focused Linux distribution while keeping things highly visible on a local network.
Here is the complete step-by-step documentation of the build, structured exactly as it happened.
Phase 1: Preparation
Step 1: Download elementary OS
I navigated to the official elementary OS website to download the latest stable ISO using their customizable "Pay What You Can" download model. I chose custom pricing put £0 and pressed download

Step 2: Set Up Oracle VirtualBox
Instead of Windows Hyper-V, I launched Oracle VirtualBox Manager to act as our open-source-friendly hypervisor environment.
Phase 2 & 3: Virtual Networking and VM Creation
Steps 3 & 4: Virtual Machine Provisioning
I initialized a brand-new virtual machine within VirtualBox, targeting an Ubuntu-based 64-bit architecture to ensure optimal compatibility with the elementary OS codebase.

Step 5: Allocating Hardware Resources
To ensure a snappy desktop experience and proper network visibility, the virtual hardware was configured with the following parameters:
Memory: Allocated 4096 MB (4 GB) of base RAM.
Storage: Mounted the downloaded elementary OS installation ISO onto the virtual IDE storage controller.
Networking: Changed the adapter pattern from standard NAT to a Bridged Adapter bound to my host network interface card. This lets the VM pull its own unique local IP address directly from the home router, streamlining future SSH administration.


With the virtual foundation ready, I launched the virtual machine instance.

Phase 4: Installing elementary OS
Steps 6 & 7: Operating System Setup
Upon boot, the elementary OS installer loaded cleanly. I selected the language and layout preferences before choosing the clean install route (Erase Disk and Install).

The installation process executed efficiently, copying over core system architecture components.

During the user configuration stage, I personalized the system configuration by creating my primary administrative user identity under the name Fabio Rodrigues.

Step 8: First System Login
Following a quick system reboot, the elegant, minimalist Pantheon desktop login environment initialized successfully right on schedule.

Phase 5: Initial Configuration
Steps 9 & 10: Running Core System Updates
A safe Linux environment begins with an updated repository index. I opened the system terminal through the applications tray and immediately fetched the latest system definitions and packages.
Bash
sudo apt update && sudo apt upgrade -y


Phase 6: Core Software Deployment
Steps 11 & 12: Application Suite Provisioning
To transform this into a functional daily driver workstation, I deployed a customized application payload containing productivity suites, multimedia handlers, development packages, and monitoring tools:
Bash
sudo apt install -y firefox vlc gimp libreoffice git curl vim htop openssh-server ufw unattended-upgrades
Following installation, I ran quick terminal verification flags to ensure the application binaries were correctly indexed and ready for operation.

Phase 7: Navigating the Pantheon Environment
Steps 13 - 15: Interface Mechanics
I paused to benchmark the native elementary OS user experience features. The desktop relies on the Pantheon Shell, combining a clean application menu overlay with a sleek bottom execution dock.
The AppCenter provides an elegant storefront experience for installing curated, open-source software utilities.

To manage multitasking workflows, I mapped individual components across isolated Workspaces via the Super + S shortcut view.
Phase 8: Hardening Security Policies
Steps 16 - 19: Workstation Security Baseline
With baseline configurations set, I locked down the workstation using standard defensive rules:
Administrative Isolation: Created an independent alternative admin profile (labadmin) and attached it to the system sudo execution matrix.
Automated Patching: Configured unattended-upgrades to handle background delivery of critical stability patches.
Firewall Infrastructure: Initialized the Uncomplicated Firewall (UFW), applying explicit allowance rules only for incoming traffic targeting Port 22 (SSH).
Bash
sudo ufw enable
sudo ufw allow 22/tcp
sudo systemctl enable ssh


To ensure remote access was functional, I verified the OpenSSH service state and identified my local IP address.

Phase 9 & 10: Remote Access and Network Diagnostics
Steps 20 - 22: Host Interactivity and DNS Integrity
Leveraging our Bridged Networking configuration from earlier, I pulled up a PowerShell window on my host workstation machine and initiated an SSH terminal link directly to the guest VM.
PowerShell
ssh testadmin@<your_vm_ip>

Once inside, I mapped out routing paths, logged default gateway vectors, and verified DNS resolution integrity by running test lookups against external web endpoints like Google.


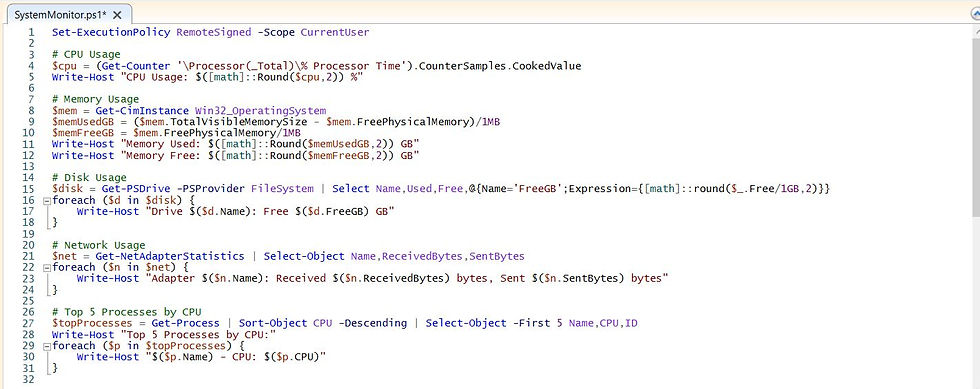
Phase 11: System Diagnostics and Performance Monitoring
Steps 23 - 26: Resource Evaluation
To evaluate system efficiency, I inspected the active software layer. I reviewed currently running services, evaluated system logs using systemd journaling, and assessed disk storage allocation.
Bash
df -h
journalctl -b


I then launched htop to observe operational overhead. Memory profiles remained exceptionally lean under standard idle constraints.


Phase 12 & 13: Task Automation and Disaster Recovery
Steps 27 - 29: Automation Scripting and Archive Verifications
For automation testing, I appended a recurring cron string to run an echo check every five minutes to confirm the scheduling engine's reliability.
Plaintext
*/5 * * * * echo "Cron Job Working" >> ~/cron-test.log

Next, I simulated a local backup regimen by packing document structures into a compressed .tar.gz archive and subsequently extracting it into an alternate folder path to verify file integrity.

Phase 14: Productivity Validation
Steps 30 - 33: Application Stress Tests
With the system hardened, it was time to put our user-facing productivity applications through their paces. I ran individual application tests to gauge responsiveness and stability under real-world usage.
First, I launched Web to evaluate heavy web browsing performance, opening multiple tabs simultaneously.

Next, I tested media playback and audio-visual decoding using VLC Media Player.

For creative production and image manipulation workloads, I opened GIMP to verify graphic acceleration capabilities by creating a quick mock-up text image.

Finally, I initialized LibreOffice Writer to test document compilation, word processing, and formatting.

Phase 15: Lab Completion and Final Evaluation
Step 34: System Resource Benchmarks
At the end of the testing phase, I pulled clean resource metrics using free -h and htop to evaluate the system footprint after sustained activity. As captured in the terminal, the system remained incredibly efficient.


Step 35: The Daily Driver Challenge
I committed to an active 30-minute workspace session entirely inside the VM—handling simultaneous web browsing, terminal administration, and media playing to simulate an actual working environment. The OS handled the multitasking beautifully without stuttering.
Step 36: Security Audit Checklist
Before drawing conclusions, I ran a comprehensive security audit check to verify that all configured hardening frameworks (UFW firewall rules, automatic unattended upgrades, and secure SSH configuration) remained active, properly provisioned, and functional under load.
Step 37: Final Verdict and System Analysis
The system performed remarkably well throughout the duration of the lab environment testing. Below is the final breakdown of system performance metrics collected during active operation:
Assessment Metric | System Lab Result |
Idle Memory Consumption | 846 MB (out of 3.8 GB allocated) |
Average Idle CPU Usage | ~1.3% |
Overall Experience Rating | 8.5 / 10 |
What Impressed Me: The speed and visual consistency of the Pantheon desktop environment. Running at under 850 MB of RAM usage at idle is fantastic. It operates with significantly lower resource overhead than a standard Windows setup while delivering an incredibly cohesive, premium experience right out of the box.
What Frustrated Me: The sandboxed curation of AppCenter means you will find yourself relying heavily on terminal commands or custom repositories if you need specialized software or development tools outside their ecosystem.
Would I Use It Daily? Absolutely. For anyone whose workload revolves around web services, open-source administration, or writing, elementary OS provides a distraction-free workstation environment that breathes new life into virtualized hardware.


Comments