
Deploying Proxmox VE in VirtualBox: Building a Nested Virtualisation Lab
Introduction
Virtualisation is a fundamental technology in modern IT infrastructure. Platforms such as Proxmox VE allow organisations to run multiple virtual machines on a single physical server while providing centralised management of compute, storage and networking resources.
In this lab, I deployed Proxmox VE inside Oracle VirtualBox to create a nested virtualisation environment. I then configured Proxmox, applied system updates, created a dedicated user, uploaded an Ubuntu Server ISO and deployed my first Linux virtual machine.
The purpose of the project was to build a small but realistic virtualisation environment that could be expanded into a larger home lab.
Lab note: Running Proxmox inside VirtualBox is primarily useful for learning and demonstration. A production Proxmox deployment would normally run directly on physical hardware.
Project Objectives
By completing this lab, I demonstrated practical experience with:
Hypervisor deployment
Proxmox VE configuration
Patch management
Repository configuration
Storage management
Network configuration
User administration
Virtual machine deployment
Linux server administration
QEMU Guest Agent configuration
VM snapshots
Task and log monitoring
Lab Topology
The completed environment consists of a physical Windows computer running Oracle VirtualBox. VirtualBox hosts the Proxmox VE hypervisor, which in turn hosts an Ubuntu Server virtual machine.
                    Physical Computer
                           |
                           |
                    Oracle VirtualBox
                           |
                           |
                    Proxmox VE Hypervisor
                           |
                           |
                  Ubuntu Server VM
Prerequisites
Hardware
For this demonstration lab, I recommend allocating approximately:
Resource | Recommended |
CPU | 4 cores |
RAM | 16 GB physical RAM |
Free storage | 100 GB+ |
Network | Internet connection |
Because this is nested virtualisation, the physical machine needs enough resources to run both VirtualBox and the virtual machines hosted by Proxmox.
Software
The following software is required:
Oracle VirtualBox
Proxmox VE ISO
Ubuntu Server LTS ISO
Oracle VirtualBox was already installed before beginning this project.
Step 1 – Download Proxmox VE
The first step is downloading the Proxmox VE installation ISO.
The installer can be obtained from the official Proxmox website:
Download the Proxmox VE ISO Installer.

Step 2 – Create the Proxmox Virtual Machine
I opened Oracle VirtualBox and selected New to create the Proxmox virtual machine.
I configured the VM as follows:
Setting | Configuration |
Name | Proxmox-Lab |
Type | Linux |
Version | Debian (64-bit) |
I then continued through the VM creation wizard.

Step 3 – Allocate Memory
I allocated 8 GB of RAM to the Proxmox VM.
8192 MB RAM
For a smaller demonstration environment, 4 GB may work, but 8 GB provides more room for running the nested Ubuntu VM.

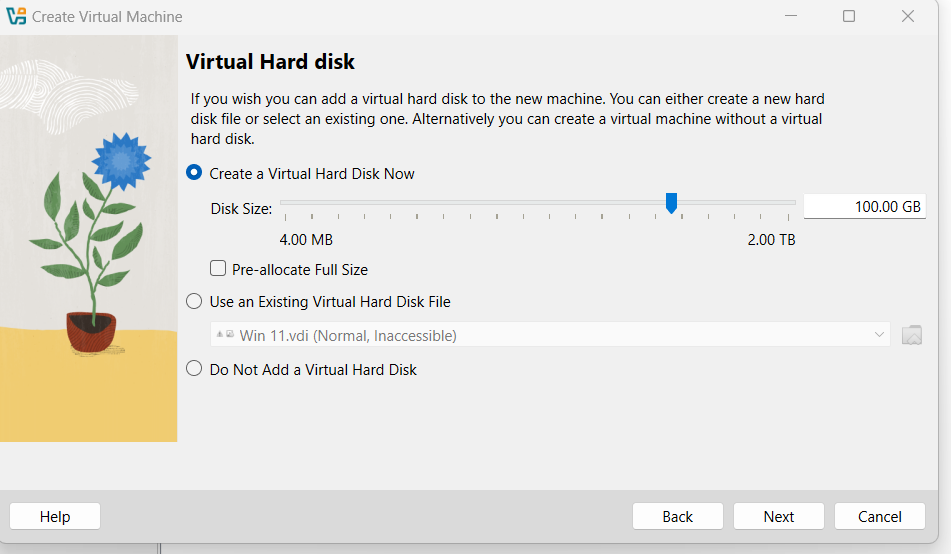
Step 4 – Create the Virtual Hard Disk
I created a virtual hard disk for the Proxmox installation.
The configuration was:
Setting | Configuration |
File type | VDI |
Storage | Dynamically allocated |
Size | 100 GB |
Using dynamically allocated storage means the virtual disk does not immediately consume the entire 100 GB from the physical machine.
Step 5 – Configure the Proxmox VM
After creating the VM, I opened:
Proxmox-Lab → Settings
Several settings were configured before starting the installation.
System → Motherboard
I/O APIC was enabled.
System → Processor
I configured:
CPU cores: 4
PAE/NX was also enabled.
Storage
I selected the empty optical drive and mounted the downloaded Proxmox VE ISO.
Network
For the management interface, I configured Adapter 1 as:
Bridged Adapter
This allows the Proxmox VM to appear on the same network as the host computer, making the Proxmox web interface accessible from the host.
Step 6 – Start the Proxmox Installation
I started the Proxmox-Lab virtual machine.
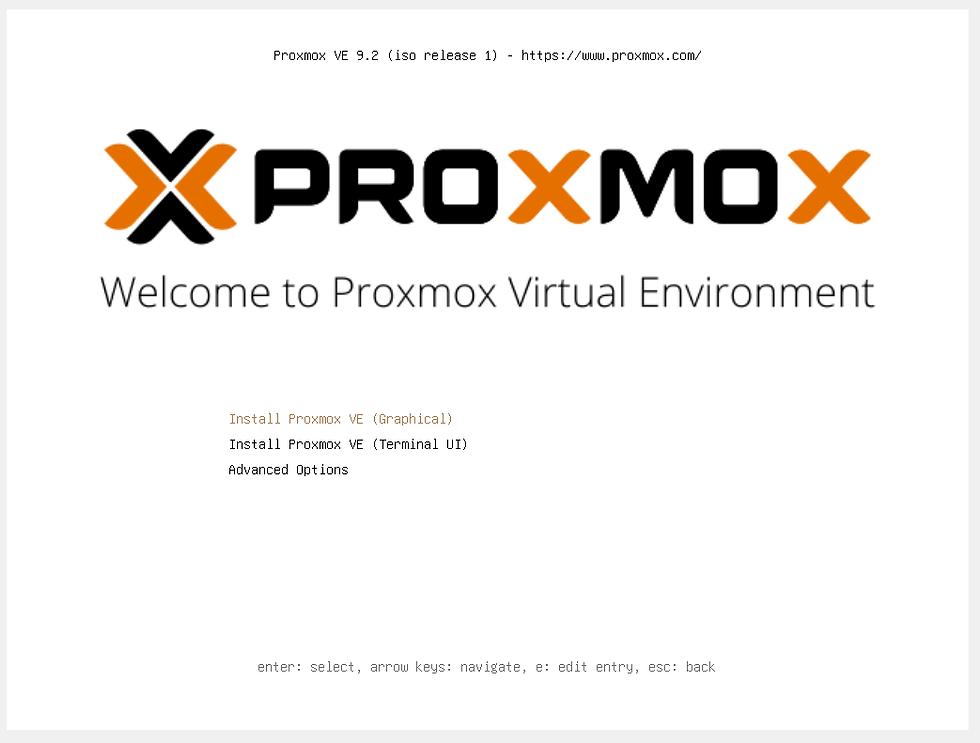
At the Proxmox boot menu, I selected:
Install Proxmox VE (Graphical)
Step 7 – Accept the Licence Agreement
The installer displayed the Proxmox VE licence agreement.
After reviewing it, I selected:
I Agree
Step 8 – Select the Installation Disk
I selected the virtual disk created earlier.
For this lab, I used:
ext4
as the filesystem.
The installation was then continued.

Step 9 – Configure Location
The installer then requested regional settings.
I configured:
Country
Time zone
Keyboard layout
These settings are important because they affect system time and keyboard configuration.
Step 10 – Configure the Administrator Account
I created the Proxmox administrator credentials.
The default administrator account is:
root
I configured a secure password and provided an email address for system notifications.
Security note: In a real environment, credentials should follow the organisation's password and privileged-access policies.
Step 11 – Configure the Network
The Proxmox management interface was configured with a static IP address.
For demonstration purposes, the configuration was:
Hostname:
FabzProxmox

IP Address:
192.168.1.50

Subnet:
255.255.255.0

Gateway:
192.168.1.1

DNS:
1.1.1.1
The exact IP configuration will depend on the network being used.

Step 12 – Install Proxmox VE
After reviewing the configuration, I selected:
Install
The installer then copied the required files and configured the Proxmox environment.
Once installation completed, I removed the installation ISO and restarted the virtual machine.

.
Step 13 – Access the Proxmox Web Interface
After rebooting, Proxmox displayed the management information on the console.
From the host computer, I opened:
Because Proxmox uses a self-signed certificate by default, the browser displayed a certificate warning.
I proceeded to the Proxmox login page.
I logged in using:
Username:
root

Authentication:
Linux PAM

Step 14 – Update Proxmox VE
One of the first administration tasks was checking for available system updates.
Keeping the hypervisor patched is important for:
Security
Bug fixes
Stability
Compatibility
General system maintenance
14.1 Open Updates
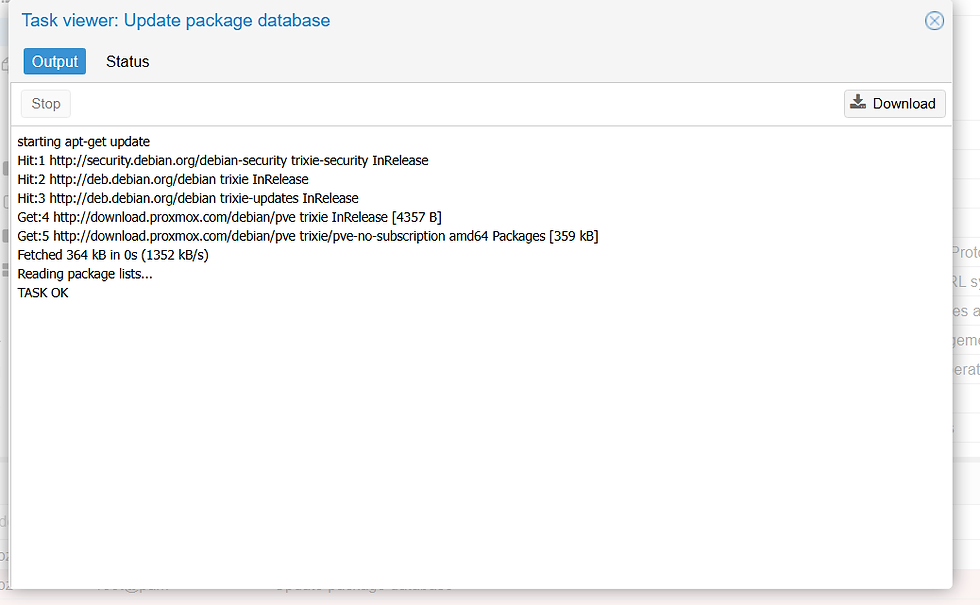
In the Proxmox interface I navigated to:
Node
 └── Updates
I selected Refresh to retrieve the latest package information.
14.2 Review Available Updates
The update interface displayed the packages available for installation.
I reviewed the:
Package names
Installed versions
Available versions
14.3 Review Repository Configuration
I then checked:
Node
 └── Updates
      └── Repositories
For a home/lab environment, the appropriate Proxmox repository configuration should be used according to the current Proxmox documentation and licensing model.
As this is for a homelab I chose "No Subscription"

14.4 Install Updates
I selected:
Upgrade
The upgrade process opened a terminal window and displayed the packages being downloaded and installed.
14.5 Reboot Proxmox
If the update process required a reboot, I navigated to:
Node
 └── System
      └── Reboot
and restarted the Proxmox node.
14.6 Verify the Update
After the system restarted, I returned to:
Node
 └── Updates
and selected Refresh.
This allowed me to confirm that the system was fully updated.
Step 15 – Explore the Proxmox Interface
Before deploying a virtual machine, I explored the main areas of the Proxmox management interface.
Datacenter
The Datacenter section provides central management for areas such as:
Users
Permissions
Storage
Backup configuration
Nodes
Node
The node view provides information about:
CPU
Memory
Storage
Network
System status
Storage
The storage section provides visibility into:
Local storage
ISO images
VM disks
Storage utilisation
Network
The networking section displays the configured interfaces and Linux bridge.
The main virtual machine bridge is:
vmbr0

Step 16 – Create a Proxmox User
Rather than using the root account for every task, I created a separate lab user.
I navigated to:
Datacenter
 └── Permissions
      └── Users
I selected:
Add
and created:
FabzTestUserI then assigned the appropriate permissions for the lab.

This demonstrates a basic principle of privileged access management: users should be given the permissions they actually require rather than relying exclusively on a root account.
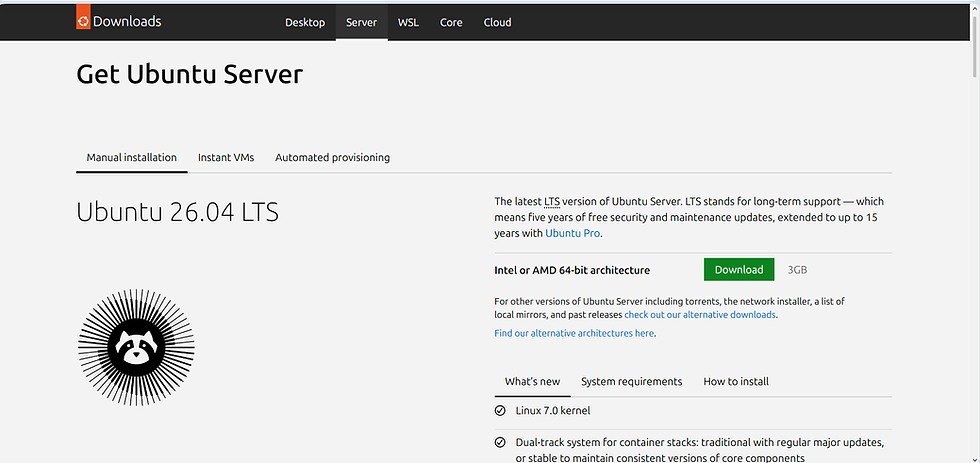
Step 17 – Download Ubuntu Server
The next stage was deploying a Linux virtual machine.
I downloaded Ubuntu Server LTS from the official Ubuntu website:
The Ubuntu Server ISO would be uploaded to Proxmox and used to install the guest operating system.
Step 18 – Upload the Ubuntu ISO to Proxmox
In Proxmox I navigated to the available storage and selected:
Node
 └── Storage
      └── ISO Images
I selected:
Upload
and uploaded the Ubuntu Server ISO.

Step 19 – Create the First Linux Virtual Machine
With the ISO available, I selected:
Create VM
I configured the virtual machine as follows.
General
Setting | Configuration |
VM ID | 100 |
Name | Ubuntu-Server-01 |
Operating System
I selected the uploaded Ubuntu ISO.
ubuntu-server.iso
The operating system type was configured as Linux.
System
The VM was configured using:
Setting | Configuration |
Machine | Default |
BIOS | SeaBIOS |
SCSI Controller | VirtIO SCSI |
QEMU Guest Agent | Enabled |
Disk
Setting | Configuration |
Bus | SCSI |
Size | 20 GB |
Storage | local-lvm |
CPU
Cores: 2
Memory
2048 MB RAM
Network
Bridge: vmbr0
Model: VirtIO
VirtIO provides a paravirtualised device model designed for efficient communication between the guest VM and the virtualisation platform.

Step 20 – Install Ubuntu Server
After creating the VM, I selected:
Ubuntu-Server-01
and clicked:
Start
I then opened the VM's Console.
The Ubuntu Server installation process was completed from the console.
I configured the server with the hostname:
ubuntu01
and created a local administrative user:
fabzubuntu
I also enabled:
OpenSSH Server
This allows the server to be administered remotely using SSH.

Step 21 – Install the QEMU Guest Agent
After Ubuntu finished installing, I logged into the server.
First, I updated the package information:
sudo apt update
sudo apt upgrade -y
I then installed the QEMU Guest Agent:
sudo apt install qemu-guest-agent -y
The service was enabled and started:
sudo systemctl enable qemu-guest-agent
sudo systemctl start qemu-guest-agent
Finally, I checked the service status:
systemctl status qemu-guest-agent
The service was confirmed to be running.
Step 22 – Verify VM Communication
I used the Ubuntu server to check its network configuration:
ip addr
I then returned to the Proxmox interface and opened:
Ubuntu-Server-01
 └── Summary
The Proxmox summary provided information about the running VM, including:
CPU utilisation
Memory utilisation
Disk information
Network information
Guest information
With the QEMU Guest Agent installed and communicating correctly, Proxmox can obtain additional information from the guest operating system.

Step 23 – Create a VM Snapshot
One of the useful features of virtualisation is the ability to create snapshots before making significant changes.
I navigated to:
Ubuntu-Server-01
 └── Snapshots
and selected:
Take Snapshot
I named the snapshot:
Clean Ubuntu Install
Description:
Fresh Ubuntu installation with updates and QEMU Guest Agent installed.

A snapshot provides a convenient rollback point for a lab environment. It should not, however, be considered a replacement for a proper backup strategy.
Step 24 – Review Tasks and Logs
Finally, I reviewed the Proxmox task history.
I navigated to:
Node
 └── Task History
This provides a useful audit trail of operations performed on the node.
Examples include:
System updates
VM creation
VM startup/shutdown
Storage operations
Configuration changes
User administration

Final Lab Environment
At the end of the project, the environment consisted of:
Physical Windows PC
        |
        v
Oracle VirtualBox
        |
        v
Proxmox VE
        |
        +------------------+
        |                  |
        v                  v
   Proxmox Storage      vmbr0
                           |
                           v
                   Ubuntu-Server-01
                           |
                           +-- Ubuntu Server
                           +-- OpenSSH
                           +-- QEMU Guest Agent
                           +-- 20 GB virtual disk
                           +-- 2 vCPU
                           +-- 2 GB RAM

What I Learned
This project provided hands-on experience with the complete deployment process of a virtualisation platform.
The main areas covered were:
Virtualisation: Deploying a Proxmox VE hypervisor inside a nested VirtualBox environment.
System administration: Configuring networking, storage, users and system updates.
Patch management: Reviewing repositories, installing updates and verifying the system afterwards.
Networking: Configuring a bridged network and using the Proxmox vmbr0 Linux bridge to provide VM connectivity.
Linux administration: Installing Ubuntu Server, configuring SSH and managing services using systemctl.
Virtual machine management: Creating, starting and monitoring a Linux VM.
Guest integration: Installing and configuring the QEMU Guest Agent.
Data protection concepts: Creating a VM snapshot and understanding its role as a rollback mechanism.
Conclusion
This project demonstrates how a relatively modest physical computer can be transformed into a useful virtualisation laboratory.
By deploying Proxmox VE inside Oracle VirtualBox, I was able to simulate many of the administration tasks involved in managing a virtualisation environment without requiring dedicated physical server hardware.
The completed environment provides a foundation for further experimentation with Linux, Windows Server, networking, Active Directory, backups, monitoring, automation and enterprise virtualisation.
More importantly, the lab can continue to evolve rather than being a one-off installation. Each additional VM or service can become another documented project and provide further hands-on experience for real-world infrastructure administration.


Comments