
Building a Rocky Linux 10.2 Enterprise Server Lab with Oracle VirtualBox
From a blank virtual disk to a fully configured Linux server
Linux administration is one of those areas where reading documentation only gets you so far. The best way to understand Linux servers is to actually build one, configure it, break things and then troubleshoot them.
For this project, I decided to build a small enterprise-style Rocky Linux server from scratch using Oracle VirtualBox.
The goal wasn't simply to install Linux. I wanted to create a reusable server that could become the foundation for future labs involving web servers, networking, security, storage, automation and monitoring.
The finished environment includes:
Rocky Linux 10.2
Oracle VirtualBox
30 GB dynamically allocated virtual disk
NAT networking
Administrative Linux user
Additional sysadmin administrator
DNF package management
SSH
firewalld
SELinux
systemd
Basic storage and resource monitoring
VirtualBox snapshot for future labs
Lab Architecture
The environment is intentionally simple to begin with.
                 Internet
                    │
                    │
              VirtualBox NAT
                    │
                    ▼
        ┌─────────────────────────┐
        │     Rocky-Lab01         │
        │                         │
        │ Rocky Linux 10.2        │
        │ 2 vCPU                  │
        │ 4 GB RAM                │
        │ 30 GB Virtual Disk      │
        │                         │
        │ SSH                     │
        │ firewalld               │
        │ SELinux                 │
        └─────────────────────────┘
This gives me a clean base server that I can expand in future projects.
Creating the Virtual Machine
I started by creating a new virtual machine in Oracle VirtualBox.
The virtual disk was configured as a 30 GB VDI disk with dynamically allocated storage.

VirtualBox showing the creation of the Rocky Linux virtual disk.
The important detail here is that the virtual disk is configured for 30 GB, but because it is dynamically allocated, the physical space consumed on the Windows host is initially much smaller.
This is confirmed by the next screenshot.
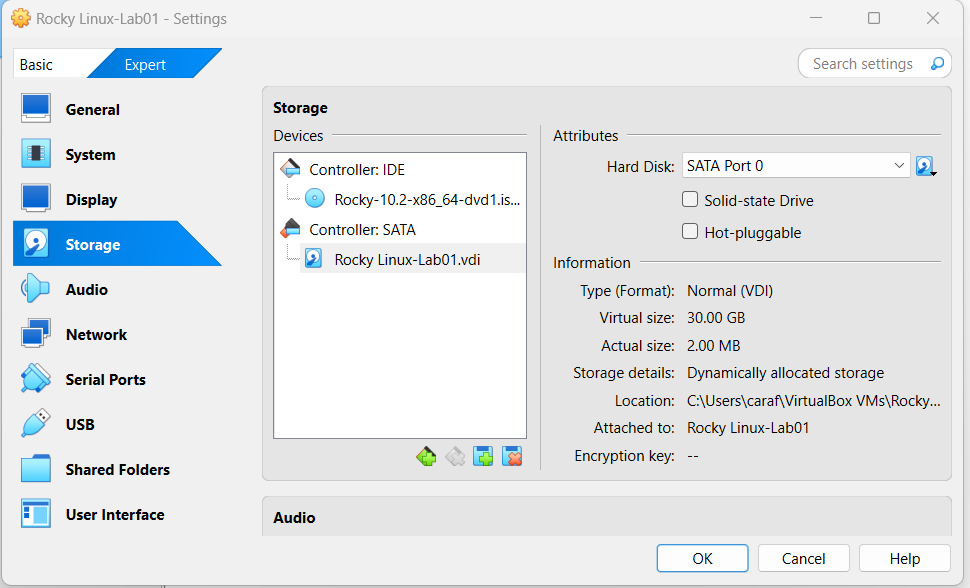
VirtualBox Storage settings showing the Rocky Linux 10.2 ISO and the 30 GB VDI disk.
The screenshot shows:
VDI format
30 GB virtual capacity
Dynamically allocated storage
Rocky Linux 10.2 installation ISO attached
This is a useful distinction when working with virtual machines: virtual capacity and actual host storage consumption are not necessarily the same thing.
2. Booting the Rocky Linux Installer
With the VM created, I attached the Rocky Linux ISO and booted the machine.
The Rocky Linux bootloader appeared with several installation options.
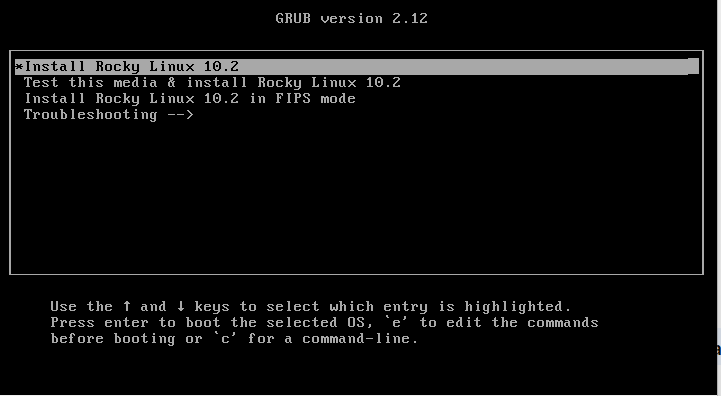
Rocky Linux 10.2 boot menu showing the standard installation option, media testing and troubleshooting options.
The standard installation option was selected.
The boot menu also provides a useful troubleshooting option, which can be helpful when diagnosing installation or boot problems.
3. Selecting the Installation Language
The Rocky Linux installer then presented the language selection screen.
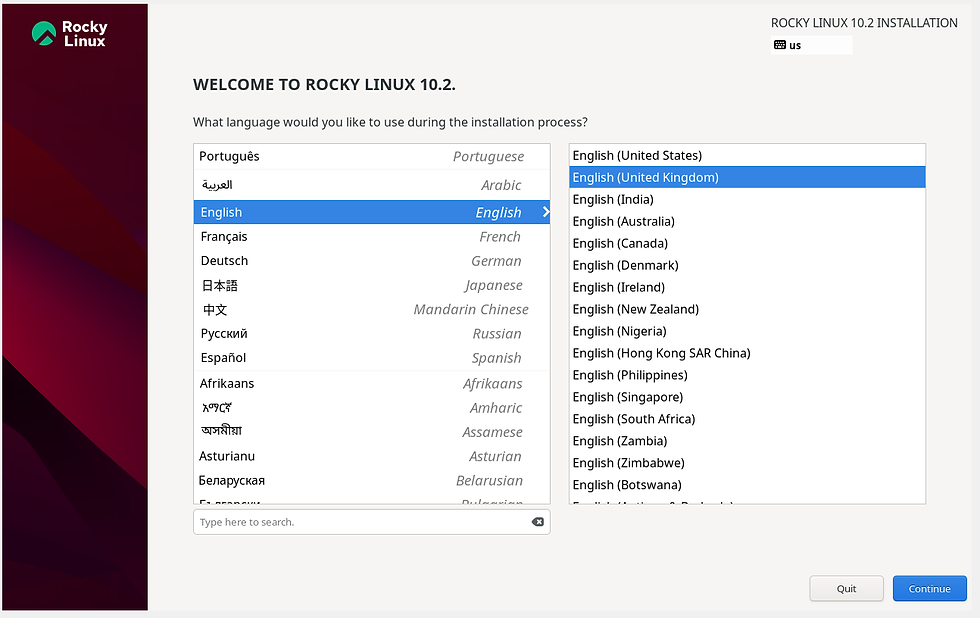
Rocky Linux 10.2 installation language selection screen.
I selected:
English → English (United Kingdom)
This is particularly useful when building a lab environment because it keeps the operating system language consistent with the language used for documentation, commands and future troubleshooting.
The installer also supports a large number of languages and regional English variants.
4. Completing the Rocky Linux Installation
The installation process then completed successfully.
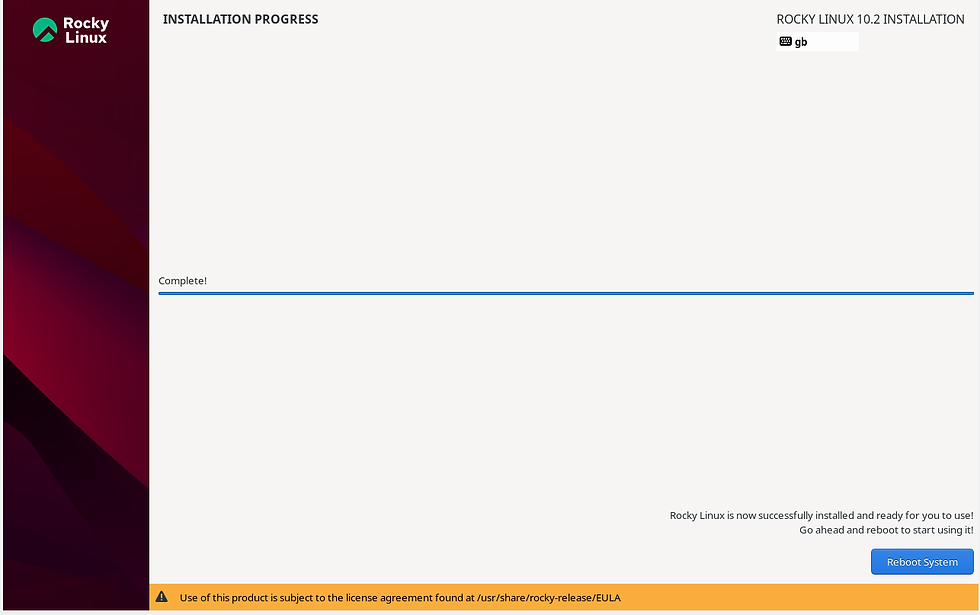
Rocky Linux 10.2 reporting that the installation has completed successfully and the system is ready to reboot.
At this point, the operating system was installed and ready for its first boot.
This is the point where the project changes from a virtual machine installation exercise into an actual Linux administration lab.
5. First Login
After rebooting the VM, I reached the Rocky Linux login screen.
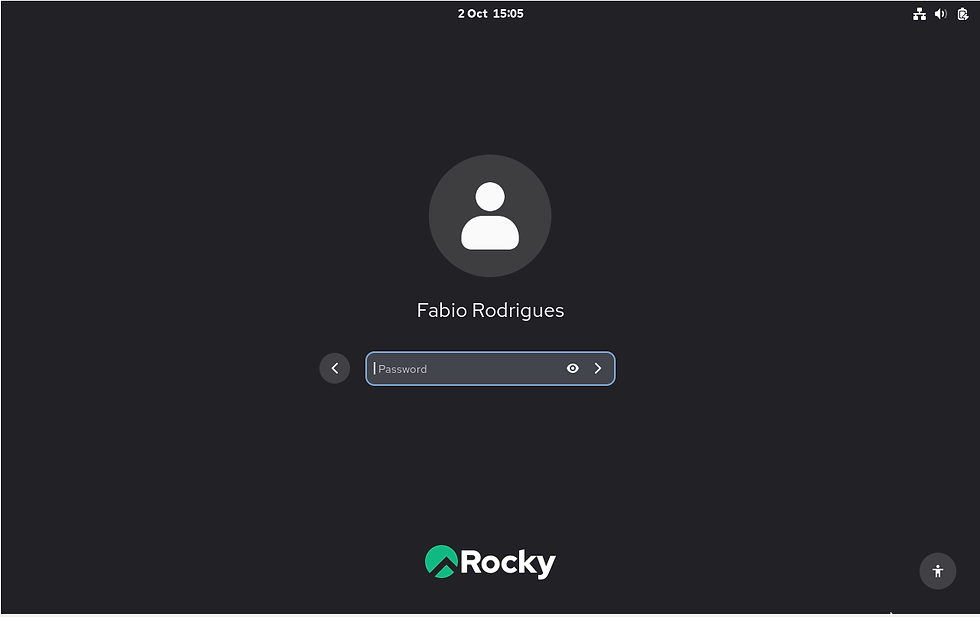
Rocky Linux graphical login screen showing the Fabio Rodrigues account.
After logging in, I opened the terminal to begin configuring the server.
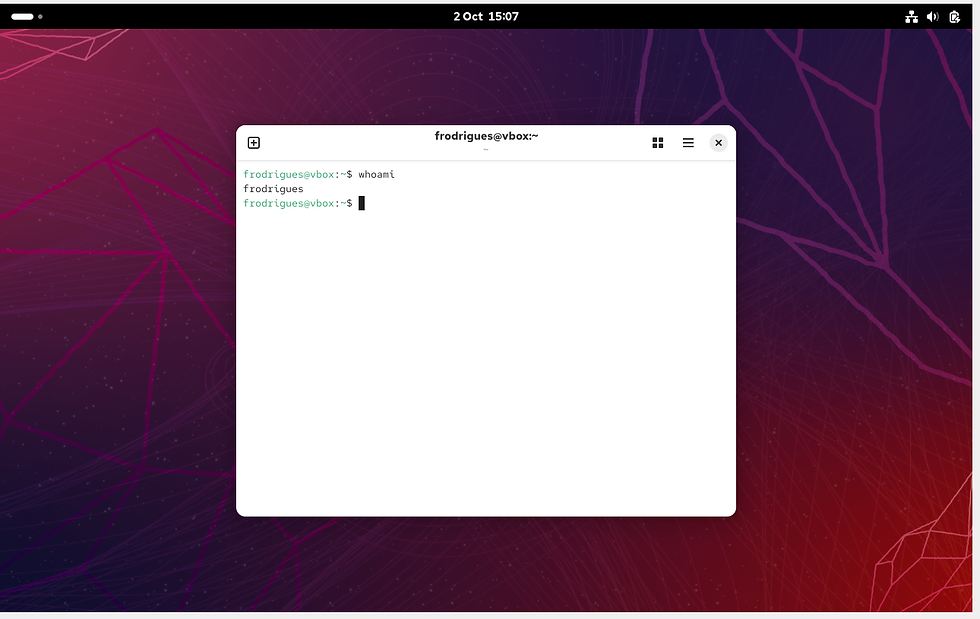
Initial Rocky Linux desktop and terminal session after installation.
The terminal became the main administration interface for the remainder of the lab.
Although Rocky Linux provides a graphical desktop in this installation, many server administration tasks are performed from the command line.
6. Confirming the Operating System
Before making changes, I wanted to establish exactly what version of Rocky Linux had been installed.
I used:
cat /etc/os-releaseI also used:
hostnamectland:
uname -r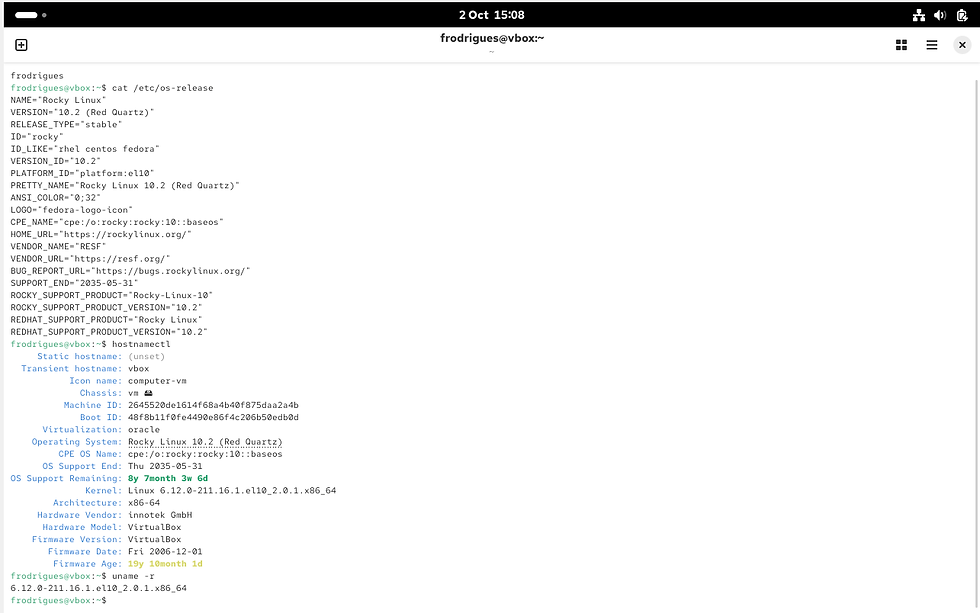
Terminal showing Rocky Linux 10.2 system information and kernel details.
This screenshot is particularly useful because it provides several important pieces of information.
The system reports:
Rocky Linux 10.2 (Red Quartz)
It also identifies:
Rocky Linux as the operating system
Linux kernel 6.12
x86-64 architecture
Oracle as the virtualization platform
VirtualBox as the virtual hardware model
A support end date shown by the system of May 31, 2035
This confirms that the lab isn't running a generic Linux distribution; it is specifically running Rocky Linux 10.2 inside VirtualBox.
7. Updating the Server
A newly installed operating system should be updated before being used as the foundation for further infrastructure.
I used Rocky Linux's DNF package manager:
sudo dnf update -y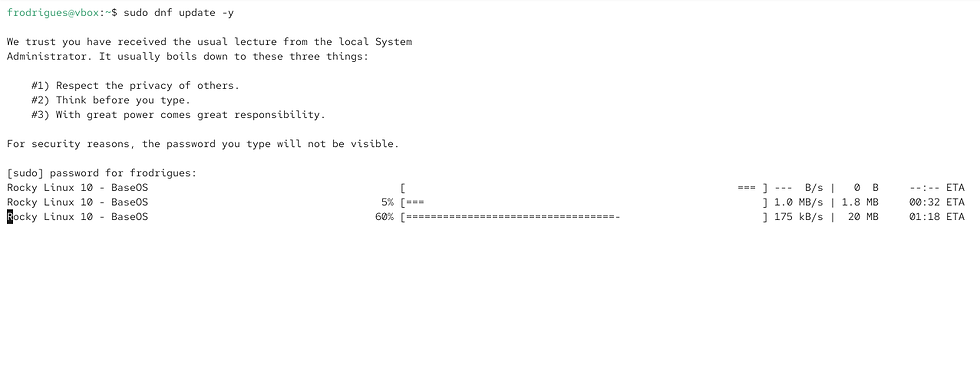
DNF contacting the Rocky Linux repositories and beginning the update process.
The update process demonstrates an important aspect of Linux administration: package management is repository-based.
Rather than manually downloading individual installers, DNF resolves dependencies and retrieves packages from configured repositories.
The next screenshot shows the packages being processed.
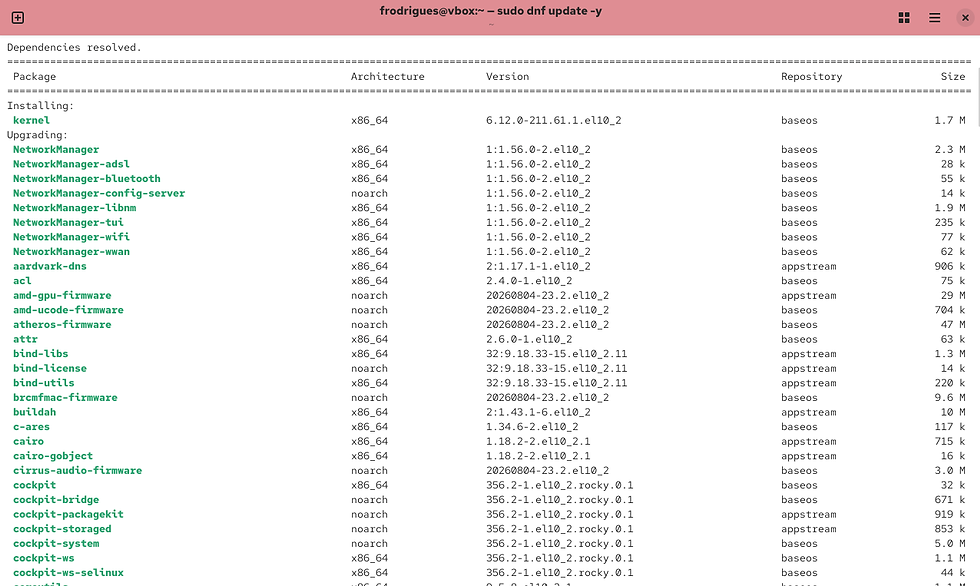
DNF dependency resolution and package update list.
The output includes important system components such as:
NetworkManager
systemd
kernel packages
BIND components
SELinux policy packages
Samba components
SSSD
This is also a useful reminder that a single system update can affect many underlying components of an operating system.
8. Reviewing the Updated System
The package update completed and the terminal showed the installed package information.
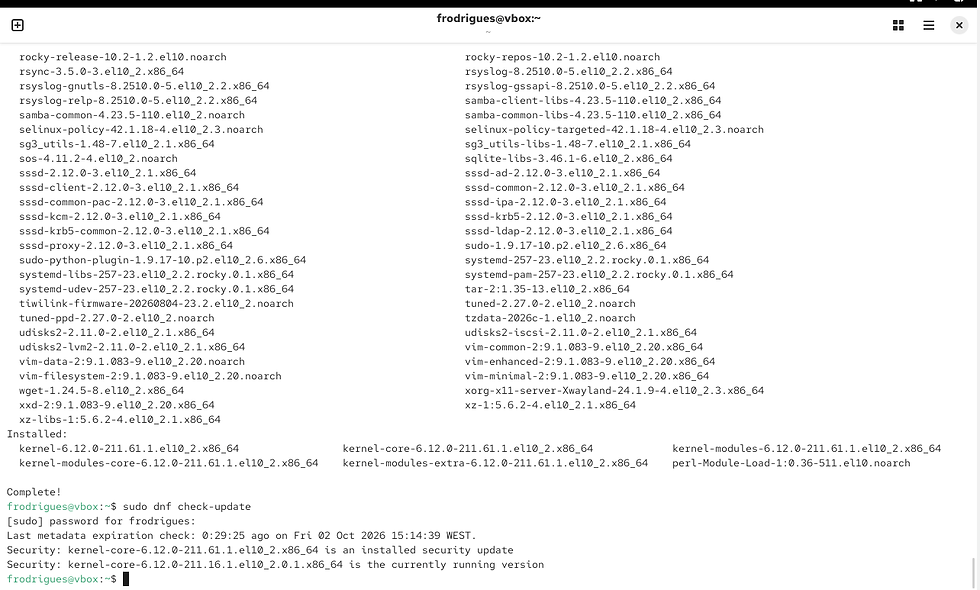
Terminal showing updated Rocky Linux packages and system components.
One interesting aspect of this screenshot is the variety of enterprise-oriented components already present in the Rocky Linux ecosystem.
The output includes packages associated with:
SELinux
SSSD
Samba
rsync
systemd
sudo
These will become useful in later labs.
9. Configuring the Server Hostname
A server should have a meaningful hostname rather than relying on a generic name.
I configured the machine as:
rocky-lab01Using:
sudo hostnamectl set-hostname rocky-lab01I then verified the configuration:
hostnamectl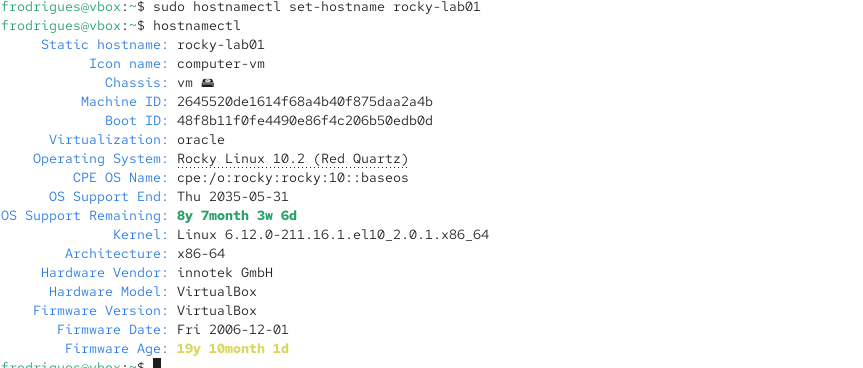
hostnamectl showing the Rocky Linux server configured as rocky-lab01.
A consistent naming convention becomes increasingly important when multiple servers are introduced.
For example, future labs could use:
rocky-lab01
rocky-web01
rocky-dns01
rocky-file01
This makes larger virtual environments much easier to manage.
10. Testing Network Connectivity
The next stage was to verify that the server had working network connectivity.
I used:
ip addrThe main network interface was:
enp0s3and the VM received:
10.0.2.15/24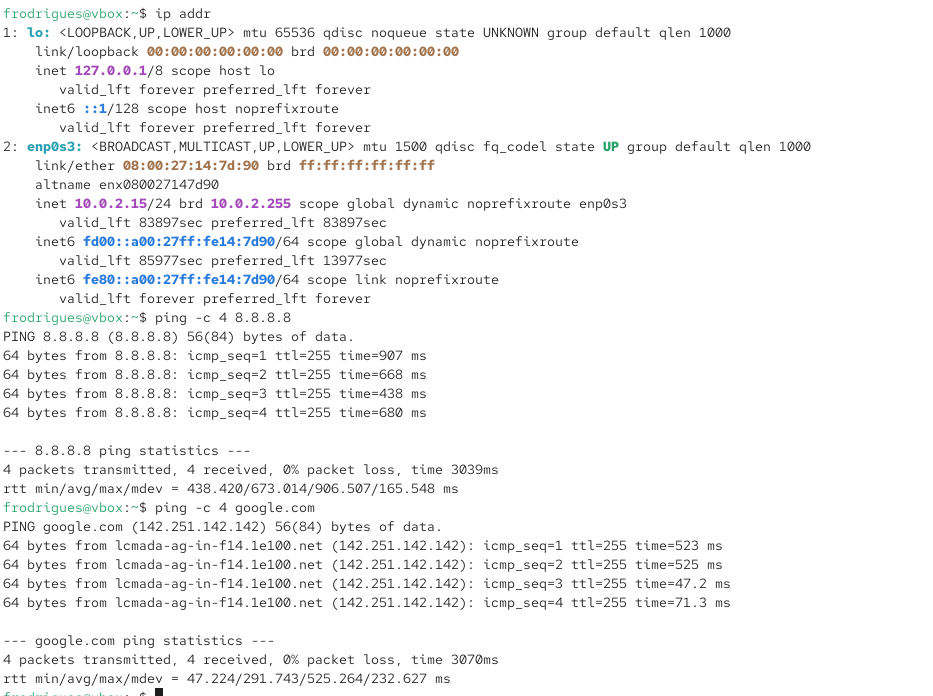
ip addr showing the loopback interface and the VirtualBox NAT interface enp0s3 with IP address 10.0.2.15.
The 10.0.2.15 address is consistent with a typical VirtualBox NAT configuration.
I then tested external connectivity:
ping -c 4 8.8.8.8The test returned four successful replies with:
0% packet lossThis confirmed that the virtual machine could reach the external network.
An important troubleshooting distinction here is that testing an IP address confirms network connectivity, while testing a hostname such as google.com also tests DNS resolution.
11. Installing Administration Tools
I installed several common administration utilities using DNF:
sudo dnf install -y vim nano wget curl git tree zip unzip bash-completionThese tools provide useful functionality for administration, scripting, file management and troubleshooting.
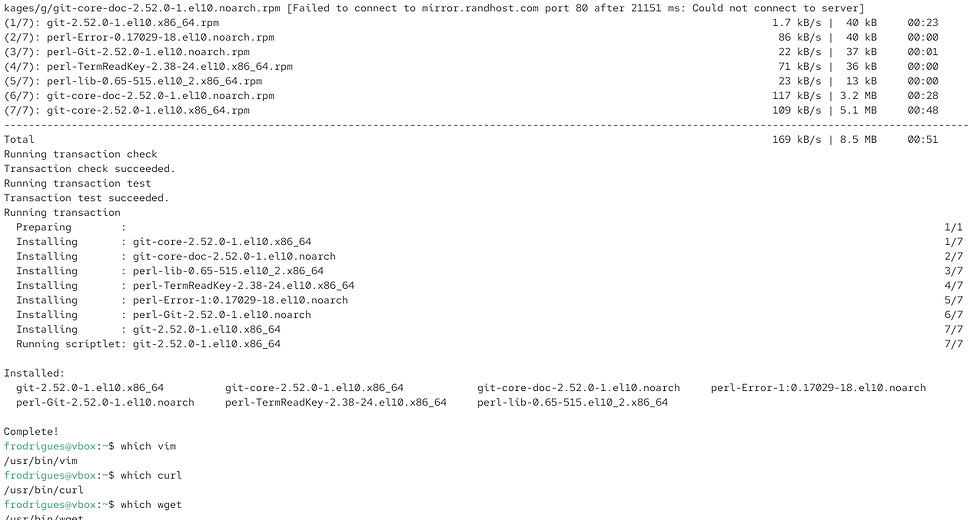
DNF installing Git and its dependencies.
There is also an interesting real-world troubleshooting detail visible in this screenshot.
One repository mirror temporarily failed to connect:
Failed to connect to mirror.randhost.comHowever, DNF continued processing the required packages and the transaction completed successfully.
This is actually a useful example of why administrators need to read package-manager output rather than assuming every warning means the entire operation failed.
The screenshot shows:
Running transaction check
Transaction check succeeded.

Running transaction test
Transaction test succeeded.

Running transaction
and ultimately the Git package was installed.
12. Creating an Additional Administrator
Rather than relying on a single administrative account, I created a second account called:
sysadminThe account was created with:
sudo useradd sysadminI then assigned a password:
sudo passwd sysadminand added the account to the wheel group:
sudo usermod -aG wheel sysadminFinally, I checked the group membership:
groups sysadmin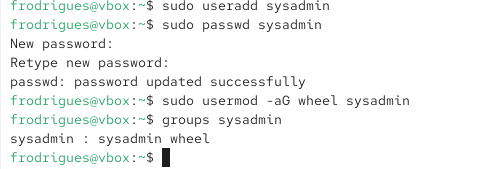
Terminal showing creation of the sysadmin account, password configuration and membership of the wheel group.
The output confirms:
sysadmin : sysadmin wheelOn Rocky Linux, membership of the wheel group is important because it provides the standard mechanism for granting administrative privileges through sudo.
This is more representative of an enterprise environment than simply using the root account for everyday administration.
13. Configuring SSH
SSH is one of the most important services when administering Linux servers remotely.
I checked for the OpenSSH server package:
sudo dnf install -y openssh-serverThe screenshot shows that the package was already installed:
Package openssh-server ... is already installed.
Nothing to do.
Complete!
I then enabled the service so that it starts automatically:
sudo systemctl enable sshdand started it:
sudo systemctl start sshdFinally:
sudo systemctl status sshd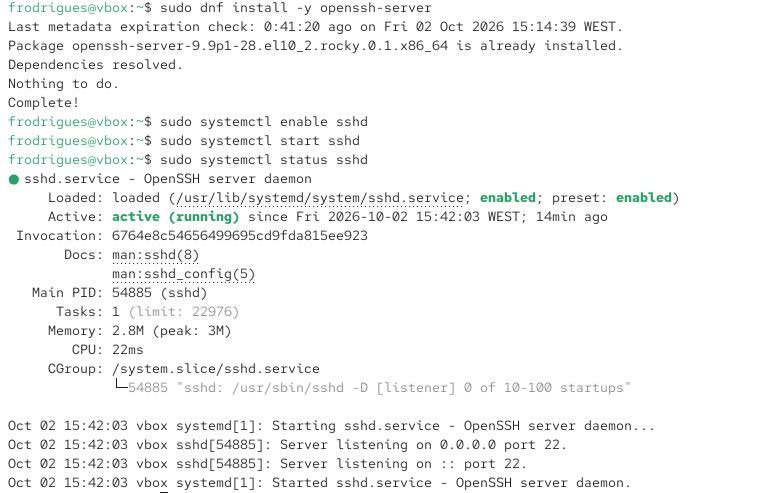
systemctl status showing the OpenSSH server active and running.
The most important line is:
Active: active (running)The screenshot also confirms that SSH is listening on port 22:
Server listening on 0.0.0.0 port 22
Server listening on :: port 22
This means the SSH daemon is listening for both IPv4 and IPv6 connections.
This will be particularly useful once I introduce additional VMs and begin administering the server remotely.
14. Configuring firewalld
Having SSH running is only part of the configuration. The firewall also needs to permit the required service.
I used:
sudo firewall-cmd --permanent --add-service=sshThe command returned:
Warning: ALREADY ENABLED: ssh
success
This is another useful troubleshooting detail.
The warning doesn't indicate a failure. It tells us that SSH was already enabled in the firewall configuration.
I then reloaded firewalld:
sudo firewall-cmd --reloadand verified the enabled services:
sudo firewall-cmd --list-services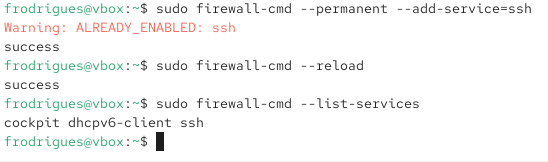
firewall showing SSH as an allowed service alongside cockpit and dhcpv6-client.
The final output included:
cockpit dhcpv6-client sshThis confirms that SSH is permitted through the firewall.
From a troubleshooting perspective, this gives us three separate things to verify when diagnosing SSH connectivity:
Is the SSH package installed?
Is the SSH service running?
Is the firewall allowing SSH?
15. Checking SELinux
Security is an important part of an enterprise Linux deployment.
Rocky Linux uses SELinux to provide mandatory access controls in addition to traditional Linux permissions.
I checked the current mode using:
getenforceThe result was:
EnforcingI then ran:
sestatus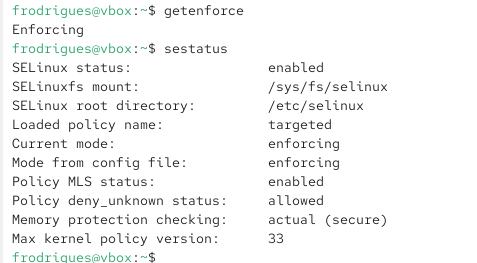
sestatus confirming that SELinux is enabled and operating in enforcing mode using the targeted policy.
The screenshot confirms:
SELinux status: enabled
Loaded policy name: targeted
Current mode: enforcing
I deliberately left SELinux enabled rather than disabling it.
This is important because future labs can now demonstrate how to troubleshoot applications that interact with SELinux policies.
16. Reviewing Running Services
Rocky Linux uses systemd for service management.
I listed currently running services with:
systemctl list-units --type=service --state=running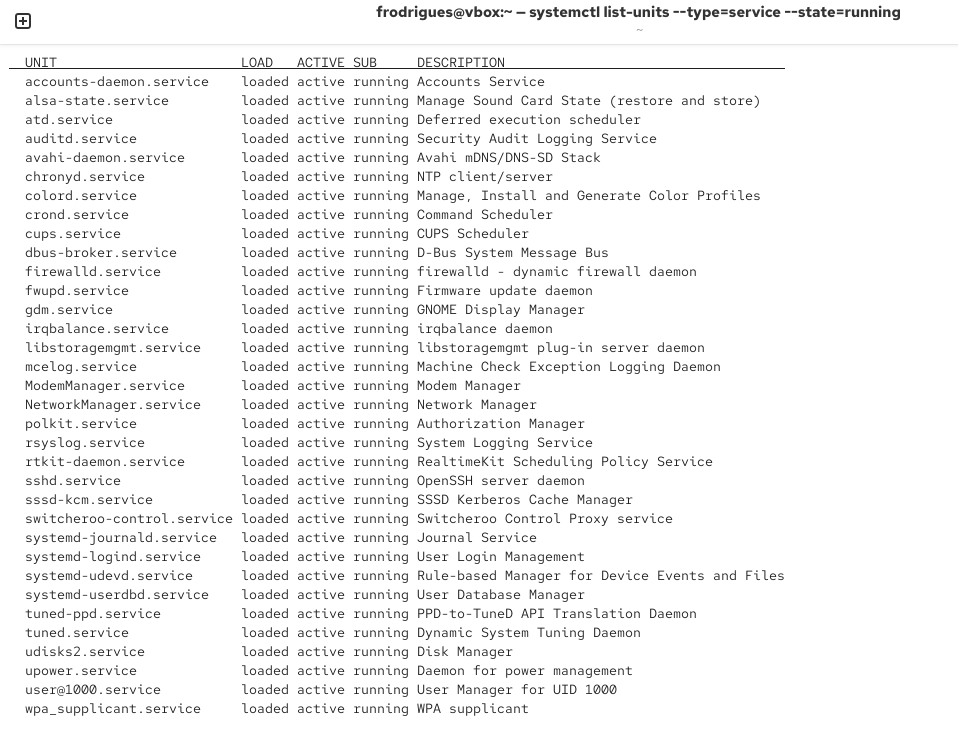
systemctl displaying the services currently running on the Rocky Linux server.
The output includes services such as:
auditd
chronyd
crond
firewalld
NetworkManager
systemd
Other desktop and system services
This is a useful command for troubleshooting because it provides a quick overview of what the operating system is currently running.
In a production-style server, administrators would also review whether unnecessary services are enabled.
17. Checking System Resources
I then checked the server's current resource utilisation.
Memory:
free -hDisk:
df -hSystem load:
uptimeStorage devices:
lsblk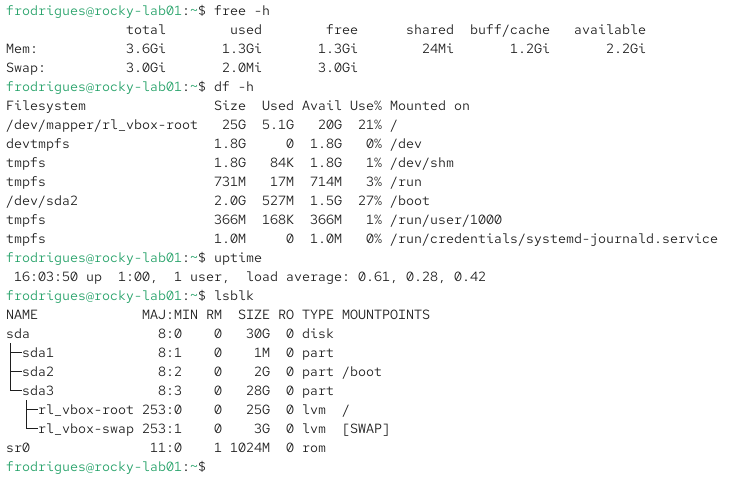
Terminal showing memory usage, filesystem usage, system uptime and block devices.
The screenshot provides a useful baseline for the VM.
The system has approximately:
3.66 GB usable memory
A 30 GB virtual disk
A small /boot partition
A root logical volume
A swap logical volume
The lsblk output is particularly interesting because the installation has created an LVM-based layout.
The virtual disk appears as:
sdawith partitions underneath it and logical volumes including:
rl_vbox-root
rl_vbox-swap
This provides a good foundation for a future LVM storage management lab.
18. Creating a LinuxLab Directory
I created a dedicated working directory for future Linux experiments:
mkdir LinuxLabThen:
cd LinuxLabI created three files:
touch server-notes.txt
touch troubleshoot.txt
touch commands.txt
Finally:
ls -lah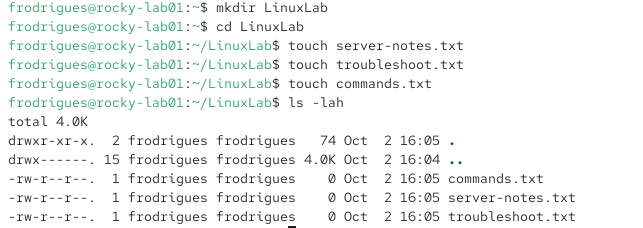
LinuxLab directory containing server-notes.txt, troubleshoot.txt and commands.txt.
Although this looks simple, it establishes a useful structure for the rest of the lab series.
The directory can eventually contain:
LinuxLab/
├── server-notes.txt
├── troubleshoot.txt
├── commands.txt
├── apache/
├── samba/
├── dns/
├── lvm/
└── ansible/
19. Creating a VirtualBox Snapshot
Once the initial configuration was complete, I shut down the VM and created a VirtualBox snapshot.

VirtualBox Snapshot Manager showing "Rocky Linux - Initial Enterprise Configuration" created on 02/10/2026.
This is an important part of a home lab.
The snapshot gives me a known-good restore point.
If a future experiment breaks networking, SSH, storage, SELinux or another component, I can return to this baseline rather than reinstalling the operating system from scratch.
What I Built
At the end of this lab, I had a working Rocky Linux 10.2 server running inside Oracle VirtualBox.
The server has:
Rocky Linux 10.2
        │
        ├── Hostname: rocky-lab01
        │
        ├── 4 GB RAM
        │
        ├── 30 GB virtual disk
        │
        ├── VirtualBox NAT networking
        │
        ├── SSH
        │
        ├── firewalld
        │
        ├── SELinux
        │
        ├── sudo / wheel administration
        │
        └── LVM storage
More importantly, I now have a clean baseline from which to build additional infrastructure.
What I Learned
This lab reinforced several important Linux administration concepts.
DNF is used to manage software and system updates.
systemd manages services such as SSH and firewalld.
firewalld controls network access to services.
SELinux provides an additional security layer beyond traditional Linux permissions.
sudo and the wheel group allow administrators to perform privileged operations without logging in directly as root.
VirtualBox NAT provides the VM with network connectivity while keeping the lab isolated from the physical network.
LVM provides a flexible storage management layer that can be expanded and modified in future exercises.
And perhaps most importantly, troubleshooting is about looking at evidence.
The screenshots from this lab show several examples:
A repository mirror connection issue
An already-enabled firewall rule
Package installation status
SSH service state
SELinux enforcement
Network interface configuration
Disk and memory utilisation
These are exactly the kinds of details that become useful when diagnosing real infrastructure problems.
What's Next?
This Rocky Linux server is now going to become the foundation for a larger home-lab environment.
The next project will focus on Linux users, groups and permissions, creating a more realistic multi-user environment and exploring how Linux controls access to files and directories.
After that, the lab can expand into:
Apache web server
LVM storage management
Samba file sharing
DNS
DHCP
Podman containers
Ansible automation
Linux security hardening
Prometheus and Grafana monitoring
Linux troubleshooting scenarios
The ultimate goal is to build a small virtual enterprise environment entirely inside Oracle VirtualBox and document the entire journey.
Project Summary
Project: Rocky Linux Enterprise Server Deployment Platform: Oracle VirtualBox Operating System: Rocky Linux 10.2 (Red Quartz) Networking: VirtualBox NAT Storage: 30 GB dynamically allocated VDI Security: firewalld + SELinux Remote Administration: OpenSSH Storage Management: LVM Status: Completed


Comments