
Building a Windows Server 2025 Domain Controller Lab in Oracle VirtualBox
Updated: Jul 29
If you're studying for Microsoft certifications, looking to move into systems administration, or simply want hands-on experience with enterprise infrastructure, there's no substitute for building your own Active Directory lab.
In this project, I built a small Windows domain from scratch using Oracle VirtualBox, consisting of a Windows Server 2025 Domain Controller and a Windows 11 client. Along the way, I configured Active Directory, DNS, DHCP and joined the client to the domain—just as you would in many real-world business environments.
This lab is perfect for practising common IT support tasks such as user administration, password resets, Group Policy, domain joins and troubleshooting.
Lab Overview
Virtual Machines
Machine | Operating System | Purpose |
Fabz Win Server | Windows Server 2025 | Domain Controller, DNS, DHCP and ADDS |
Win 11 Lab | Windows 11 Pro | Domain-joined workstation |
Network Configuration
Setting | Value |
Domain | Fabz.Local |
Domain Controller | FabzWinServer |
Server IP | 192.168.100.10 |
DHCP Scope | 192.168.100.100 – 192.168.100.200 |
Installing Windows Server 2025
The first step was creating a Windows Server 2025 virtual machine in Oracle VirtualBox.
I selected the Desktop Experience edition rather than Server Core, giving me the familiar graphical interface that is ideal for learning.
After installation:
Installed VirtualBox Guest Additions
Renamed the server to FabzWinServer
Configured a static IP address
Installed Windows Updates

Installing Active Directory Domain Services
Using the Add Roles and Features Wizard, I installed:
Active Directory Domain Services
DNS Server
Once the installation completed, I promoted the server to a Domain Controller.

Creating the Domain
Rather than joining an existing domain, I created a brand-new Active Directory forest.
Fabz.local
This automatically configured:
Active Directory
DNS
SYSVOL
NETLOGON
The server rebooted once promotion completed.

Verifying Active Directory
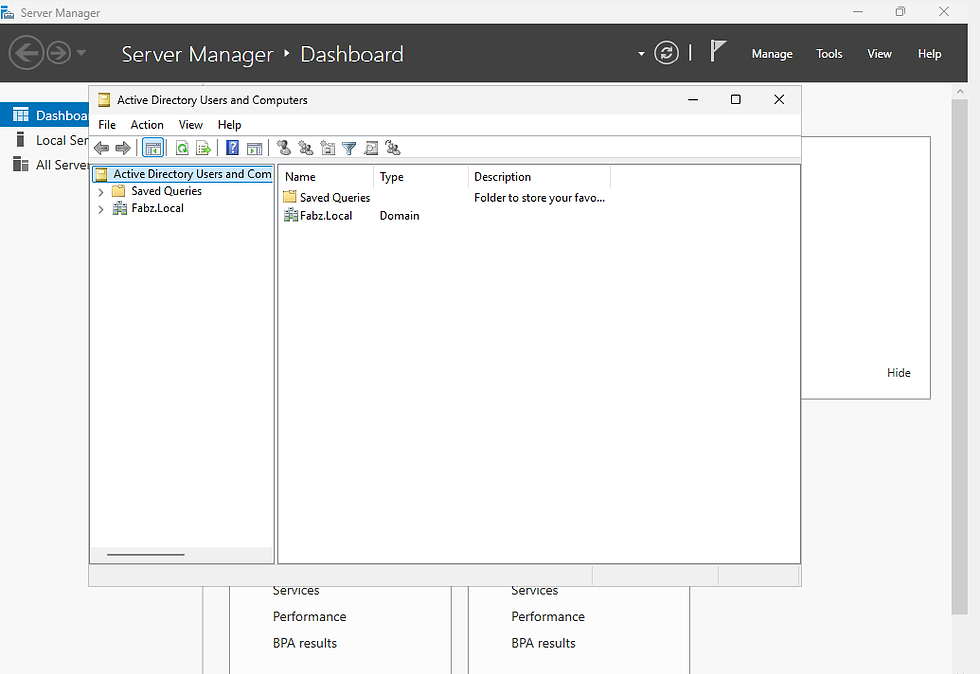
After restarting, Active Directory Users and Computers showed the newly created domain.
This confirmed that the promotion completed successfully.
Organising Active Directory
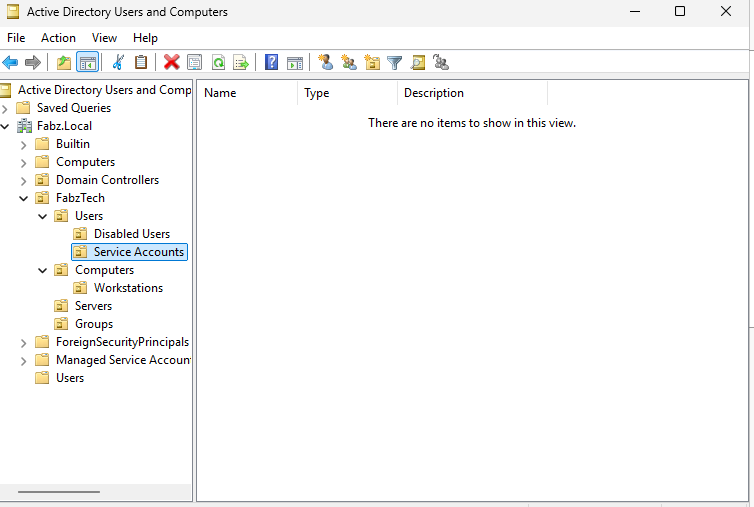
To keep the environment organised, I created a simple OU structure.
Company
│
├── Users
├── Groups
├── Computers
├── Servers
├── Service Accounts
└── Disabled Accounts
This mirrors how many organisations separate different types of objects.
Creating Domain Users
Next I created several user accounts.
Example:
Freddie Mercury
Additional users were created to simulate different departments.
These accounts will later be used for testing permissions and Group Policies.


Installing DHCP
With Active Directory running, the next step was installing the DHCP Server role.
Using Server Manager:
Installed DHCP
Authorised the server in Active Directory
Completed the post-install configuration

Creating a DHCP Scope
A DHCP scope named Office LAN was created.
Configuration:
Setting | Value |
Start IP | 192.168.100.100 |
End IP | 192.168.100.200 |
Gateway | 192.168.100.1 |
DNS | 192.168.100.10 |
This allows Windows clients to automatically receive their network configuration.


Installing Windows 11
A second virtual machine was created for Windows 11.
After installation:
Created a local administrator account
Renamed the computer to Win11Lab
Connected it to the same VirtualBox network as the server

Joining the Domain
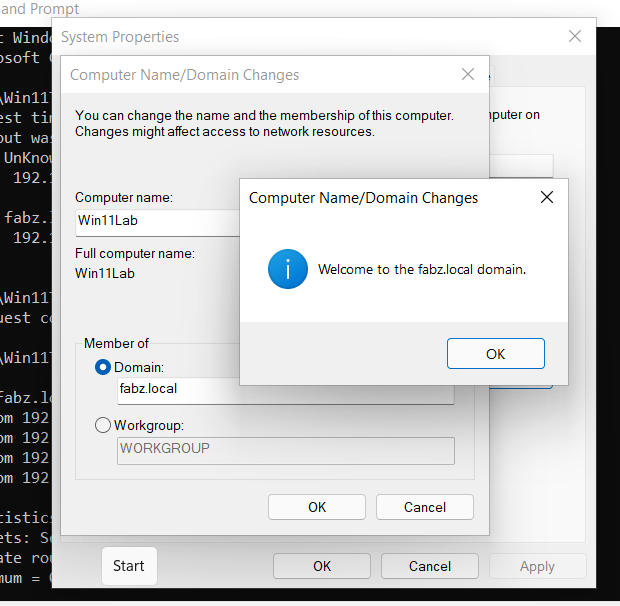
The Windows 11 computer was then joined to:
Fabz.local
using the domain administrator account.
Following a restart, Windows displayed the familiar Other user login screen, indicating that domain authentication was now available.
Logging In as a Domain User
Instead of signing in with a local account, I logged in using the created domain accounts created to test connectivity:
The domain profile logged in successfully prompting for a password change at first login, confirming communication between the client and the Domain Controller.


Creating Network Share
One of the most common tasks for a Windows Server administrator is creating shared folders that allow users to access company files across the network. To simulate a real-world business environment, I created a shared folder on the Domain Controller, assigned permissions to selected Active Directory users, and then verified access from my Windows 11 client.
Creating the Shared Folder
On the Server, I created a new folder named Company at the following location:
C:\Shares\CompanyUsing Server Manager, I navigated to File and Storage Services → Shares and created a new SMB share named Company. Once the wizard completed, the new share appeared alongside the default NETLOGON and SYSVOL shares that Active Directory creates automatically.

Configuring Share and NTFS Permissions
After creating the share, I configured both the Share Permissions and NTFS Security Permissions.
Rather than granting access to everyone, I followed the principle of least privilege by giving only selected domain users permission to access the folder.
The following users were granted Read & Execute permissions:
Freddie Mercury
Brian May
John Deacon
Roger Taylor
The FABZ\Administrators group retained Full Control, allowing administrators to manage the share while standard users could only access the files they required.

Testing Access from Windows 11
With the permissions configured, I switched to my Win11Lab virtual machine and logged in using one of the authorised domain user accounts.
To test the share, I opened File Explorer and entered the following UNC path into the address bar:
\\DC01\CompanyAlternatively, if name resolution is unavailable, the server's IP address can be used:
\\192.168.100.10\CompanyThe shared folder opened successfully without prompting for additional credentials, confirming that the Windows 11 client could authenticate against Active Directory and access the network share using the logged-in user's domain permissions.

Mapping the Network Share
To make the shared folder permanently available, I mapped it as a network drive.
Open File Explorer.
Right-click This PC.
Select Map network drive.
Choose a drive letter (for example, S:).
Enter:
\\DC01\CompanyTick Reconnect at sign-in.
Click Finish.
The mapped drive now appeared under This PC, allowing quick access to the shared folder whenever the user signs in.

Verifying Active Directory
Back on the Domain Controller, Active Directory automatically created the new computer object under the default Computers container, confirming the domain join had completed successfully.

What I Learned
Building this lab reinforced several core Windows Server concepts, including:
Installing Windows Server 2025
Configuring static networking
Installing Active Directory Domain Services
Creating a new forest
Understanding DNS within Active Directory
Installing and configuring DHCP
Creating organisational units
Managing users and groups
Joining Windows 11 to a domain
Verifying DHCP leases and domain connectivity
Although this is a small environment, it closely reflects the technologies used in many production business networks.


Comments